OpenAgents
3.5k 367What is OpenAgents ?
OpenAgents is an Open Platform for Language Agents in the Wild.
Current language agent frameworks aim to facilitate the construction of proof-of-concept language agents while neglecting the non-expert user access to agents and paying little attention to application-level designs.
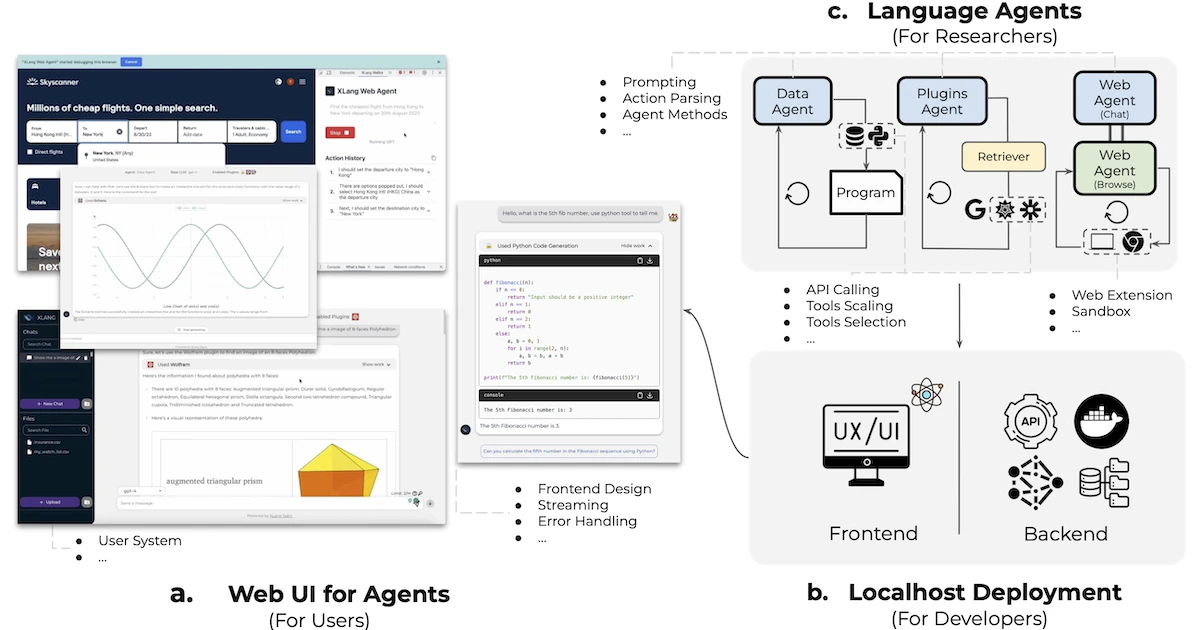
OpenAgents is an open platform for using and hosting language agents in the wild of everyday life.
Three agents are now implemented in OpenAgents, and their hosted on demo for free use!
-
Data Agent for data analysis with Python/SQL and data tools;
-
Plugins Agent with 200+ daily tools;
-
Web Agent for autonomous web browsing.
OpenAgents can analyze data, call plugins, control your browser as ChatGPT Plus, but with OPEN Code for
-
Easy deployment
-
Full stack
-
Chat Web UI
-
Agent methods
OpenAgents enables general users to interact with agent functionalities through a web UI optimized for swift responses and common failures, while offering developers and researchers a seamless deployment experience on local setups, providing a foundation for crafting innovative language agents and facilitating real-world evaluations.
OpenAgents Features
Data Agent
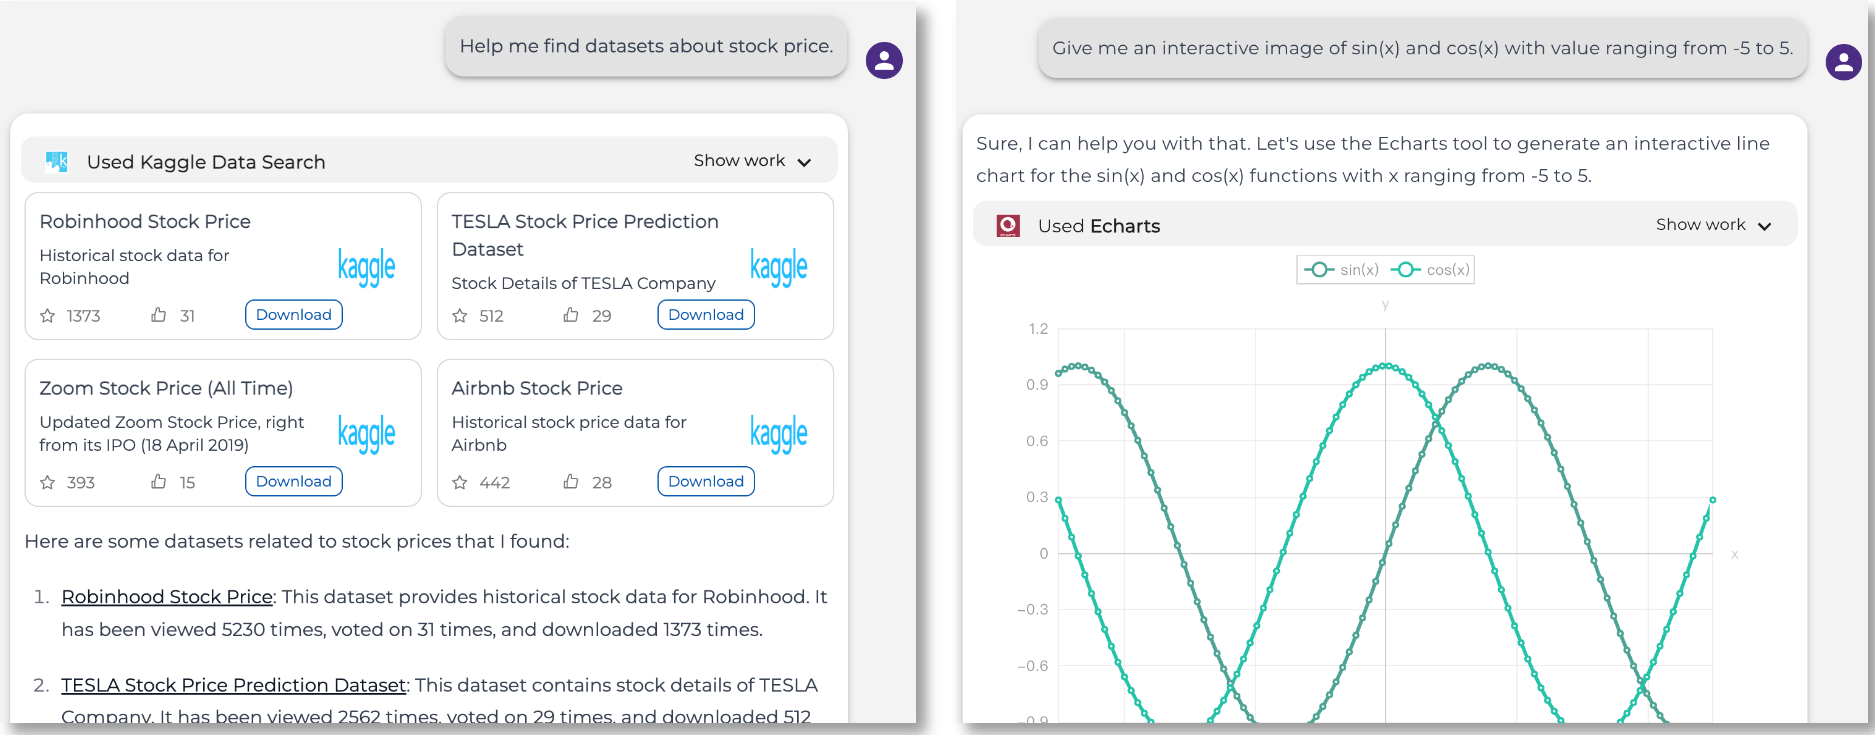
Data Agent is a comprehensive toolkit designed for efficient data operations. It provides capabilities to:
-
🔍 Search: Quickly locate the data you need.
-
🛠️ Handle: Streamline data acquisition and processing.
-
🔄 Manipulate: Modify data to suit specific requirements.
-
📊 Visualize: Represent data in a clear and insightful manner.
With its proficiency in writing and executing code, Data Agent simplifies a wide range of data-centric tasks. Discover its potential through various use cases.

Plugins Agent
Plugins Agent seamlessly integrates with over 200 third-party plugins, each handpicked to enrich various facets of your daily life. With these plugins at its disposal, the agent empowers you to tackle a wide range of tasks and activities more efficiently.
🔌 Sample Plugins Include:
-
🛍️ Shopping: Klarna Shopping
-
☁️ Weather: XWeather
-
🔬 Scientific Exploration: Wolfram Alpha
Combined Plugin Usage
Harness the power of synergy! Plugins Agent supports the concurrent use of multiple plugins. Planning a trip? Seamlessly integrate functionalities from Klook, Currency converter, and WeatherViz.
Auto Plugin Selection
Simplify your choices with our Auto Plugin Selection feature. Let the agent intuitively search and suggest the best plugins tailored to your needs.
Dive into more use cases to see Plugins Agent in action.


Web Agent
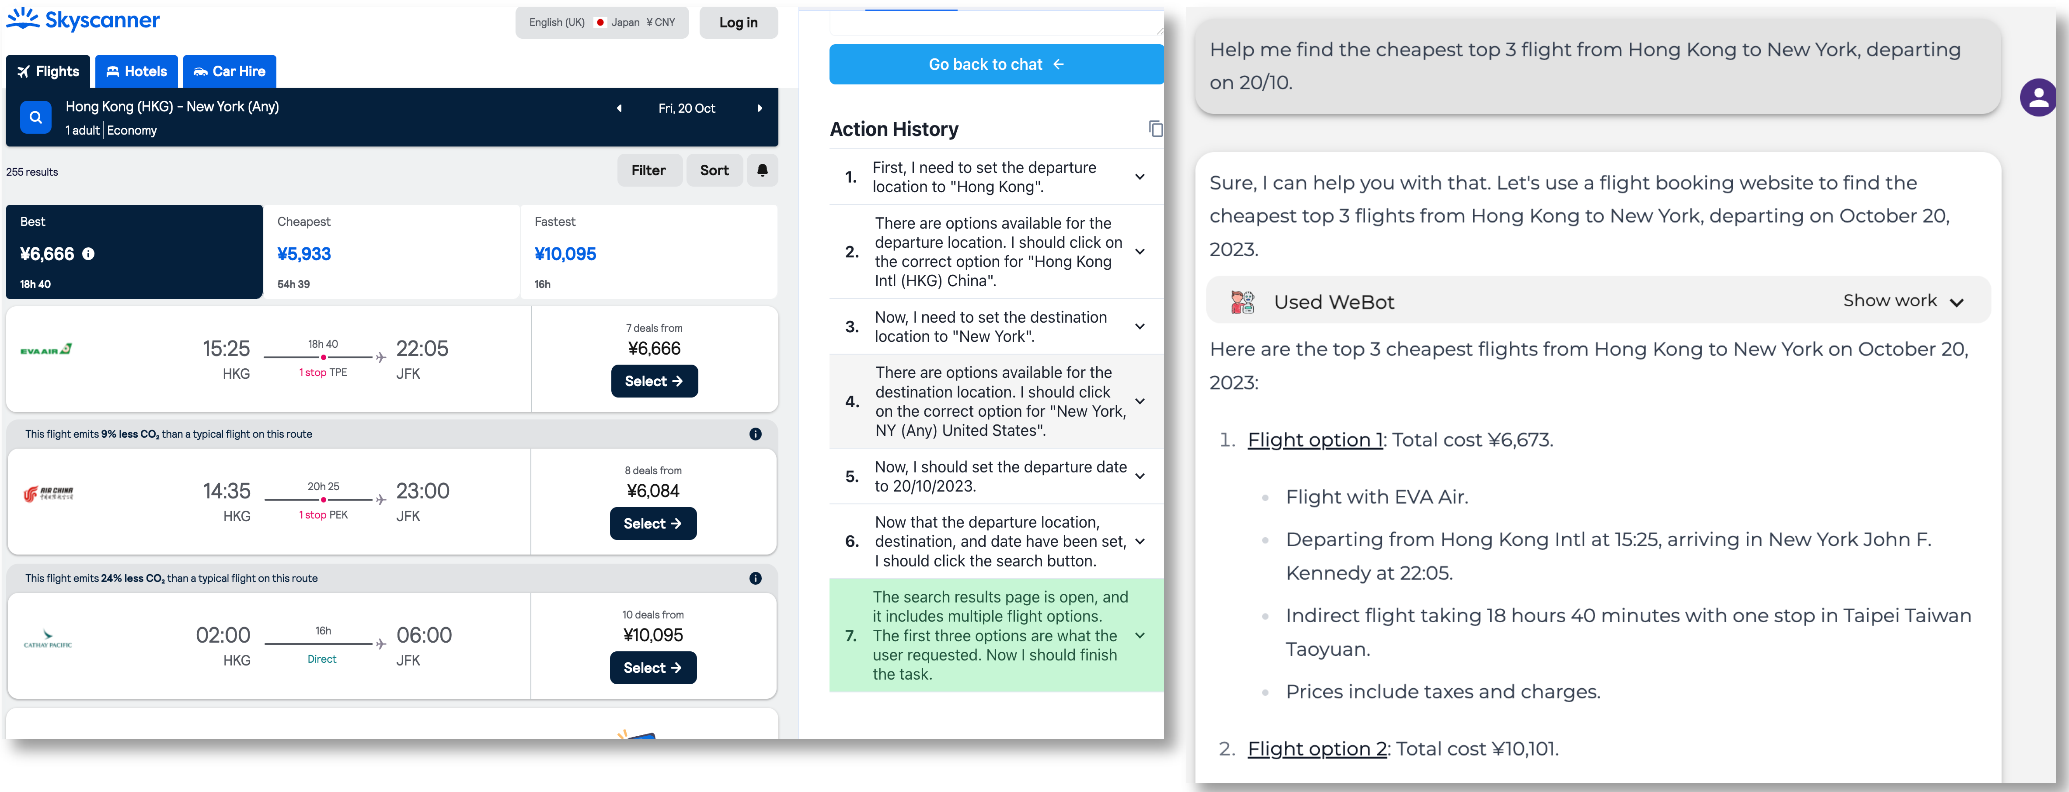
Web Agent harnesses the power of a Chrome extension to navigate and explore websites automatically. This agent streamlines the web browsing experience, making it easier to find relevant information, access desired resources, and so on.
Examples of What Web Agent Can Do:
-
📍 Google Maps Navigation: Planning a journey? Simply relay your starting point and destination to Web Agent. It will navigate Google Maps for you and present the best routes.
-
🐦 Twitter Postings: Engage in a conversation with Web Agent and wish to share something on Twitter? Mention the content, and Web Agent will handle your tweet effortlessly.
-
📝 Google Form Assistance: Need to sign up for an event or activity? Share the Google Form link and the required details. Web Agent will populate the form for you.
Witness the full potential of Web Agent in these use cases.

💻 Localhost Deployment
We’ve released the OpenAgents platform code. Feel free to deploy on your own localhost!
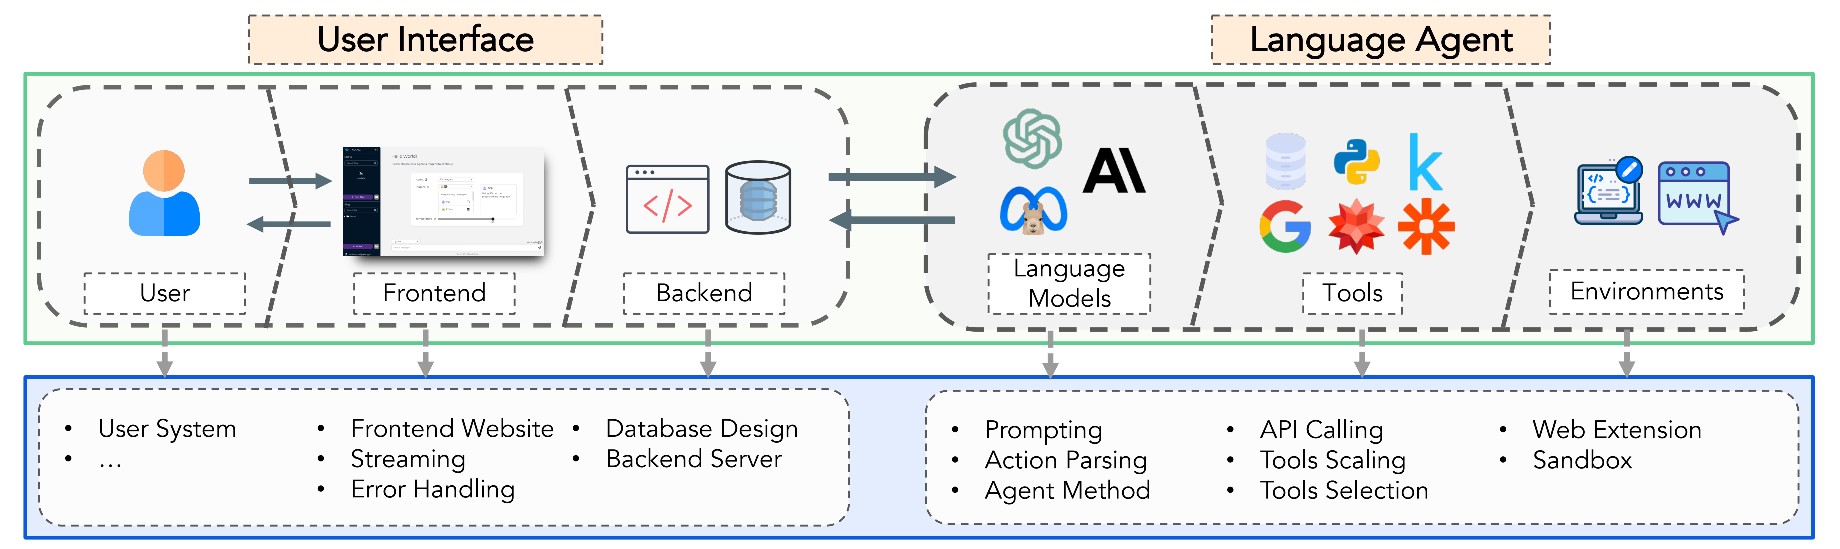
Here is a brief system design of OpenAgents:
From Source Code
Please check the following folders and README files to set up & localhost:
-
Backend: the flask backend to host our three agents.
-
Frontend: the frontend UI and WeBot Chrome extension.
p.s.: We have renamed some arguments in code for better readability. If you have pulled the code before 10/26/2023, just a reminder that if you want to you pull the latest code, previous local chat history will be lost because of different key names.
Docker
Please follow the following steps to use the docker-compose to deploy the OpenAgents platform.
Note: the docker is under development, so there may be functions not working properly as expected and slower response. Please feel free to open an issue if you have any questions. If you want a more robust version, currently we recommend you to deploy from source code.
- If you want to use kaggle’s dataset, you must modify the information in the Dockerfile to your correct information.
ENV KAGGLE_USER="" KAGGLE_KEY=""- If you are not running locally, you need to modify the accessible IP to the backend service in frontend/Dockerfile
ENV NEXT_PUBLIC_BACKEND_ENDPOINT http://x.x.x.x:8000-
Run the
docker compose buildcommand in the project root directory. -
If you use openai unofficial services, such as FastChat, you need to modify
OPENAI_API_BASEin docker-compose.yml;otherwise you only to put yourOPENAI_API_KEYin docker-compose.yml -
After completing the above steps, you can run
docker compose up -dto start all services.
Notice:
-
If you want to use GPU, you need install Nvidia Container Toolkit,and uncomment the the docker-compose.yml Lines 56-62.
-
Use Auto Plugin will download the weight file from huggingface. In some areas, connection timeout may occur. Please solve the network problem by yourself.
📜 Tutorial on Extending OpenAgents
Code Structure
Before we dive into how to extend OpenAgents, let’s first take a glance at the code structure for better understanding.
The code structure of OpenAgents is shown below:
├── backend  # backend code
│   ├── README.md  # backend README for setup
│   ├── api  # RESTful APIs, to be called by the frontend
│   ├── app.py  # main flask app
│   ├── display_streaming.py  # rendering the streaming response
│   ├── kernel_publisher.py  # queue for code execution
│   ├── main.py  # main entry for the backend
│   ├── memory.py  # memory(storage) for the backend
│   ├── schemas.py  # constant definitions
│   ├── setup_script.sh  # one-click setup script for the backend
│   ├── static  # static files, e.g., cache and figs
│   └── utils  # utilities
├── frontend  # frontend code
│   ├── README.md  # frontend README for setup
│   ├── components  # React components
│   ├── hooks  # custom React hooks
│   ├── icons  # icon assets
│   ├── next-env.d.ts  # TypeScript declarations for Next.js environment variables
│   ├── next-i18next.config.js  # configuration settings for internationalization
│   ├── next.config.js  # configuration settings for Next.js
│   ├── package-lock.json  # generated by npm that describes the exact dependency tree
│   ├── package.json  # manifest file that describes the dependencies
│   ├── pages  # Next.js pages
│   ├── postcss.config.js  # configuration settings for PostCSS
│   ├── prettier.config.js  # configuration settings for Prettier
│   ├── public  # static assets
│   ├── styles  # global styles
│   ├── tailwind.config.js  # configuration settings for Tailwind CSS
│   ├── tsconfig.json  # configuration settings for TypeScript
│   ├── types  # type declarations
│   ├── utils  # utilities or helper functions
│   ├── vitest.config.ts  # configuration settings for ViTest
│   └── webot_extension.zip  # Chrome extension for Web Agent
└── real_agents  # language agents
    ├── adapters  # shared components for the three agents to adapt to the backend
    ├── data_agent  # data agent implementation
    ├── plugins_agent  # plugins agent implementation
    └── web_agent  # web agent implementation
As shown, backend/ and frontend/ are self-contained and directly deployable (see here).
It does not mean they cannot be modified.
Instead, you can just follow the conventional client-server architecture to extend the backend and frontend as you wish.
For real_agents/ , we design it to be “one agent, one folder”, so that it is easy to extend a new agent.
It is worth noting that we name it “real agents” because not only the conceptual language agent part is included, but also the gaps between the language agent and the backend are filled here.
For example, adapters/ contains the shared adapter components like stream parsing, data model, memory, callbacks, etc.
We refer interested readers to our paper for concepts and implementation designs.
And we thank LangChain as we base on their code to build real agents.
Extend A New Agent
If you want to build a new agent beyond the three agents we provide, you can follow the steps below:
-
Refer to the
real_agents/folder to see how previous agents are implemented, and create a new folder for your agent. -
Implement the agent logic in the new folder. Use the components under
adapters/folder when needed. -
Add a
chat_<new_agent>.pyfile underbackend/api/folder to define the chat API for the new agent, which will be called by the frontend. -
Register new constants in
backend/schemas.pyif needed. -
Add a new
OpenAgentIDinfrontend/types/agent.tsand the corresponding API infrontend/utils/app/api.tsandfrontend/utils/app/const.ts. -
Implement the agent UI in
frontend/components/Chat/Chat.tsxandfrontend/components/Chat/ChatMessage.tsxwhen needed. -
Run localhost script and test your new agent.
Note, if new data types, i.e., beyond text, image, table, and json, you may need to implement its parsing logic in backend/display_streaming.py and add new data models.
Extend A New LLM
Extending a new LLM as the agent backbone is simpler if the LLM is already hosted and can be called via API.
Just register your new model in backend/api/language_model.py . Just refer to lemur-chat as a template.
If the LLM is not hosted yet, we have a tutorial on how to deploy a new LLM and expose it as an API here (LLM hosting to todo).
Extend A New Tool
If you want to extend a new tool in Plugins Agent, you can follow the steps below:
-
Refer to the already built plugins in
real_agents/plugins_agent/plugins/, and create a new folder for your tool. -
Implement the tool logic in the new folder. Note that
ai-plugin.jsonandopenapi.yamlare essential for the tool to be recognized(which can be generated by LLM following the others rather than manually written). And thepaths/are for the actual tool API call. -
Register the new tool name in
real_agents/plugins_agent/plugins/plugin_names.py.